Final Show Setup Day 2

In the second day of installation, I went first and bought some very thin pins but kind of stronger ones to get them hammered onto the prints to make sure none of it will fall during the show! this was one of the challenges because initially I had in mind to stick the work by blu tack, but then Jonathan and William mentioned that its not guaranteed to keep the prints up during the entire show! so Jonathan helped me brain storm alternative options until the idea of the pins came up!

The process took almost the entire time for me to get it done, specially that I had to hammer the entire prints alone “ps. its my first time ever using a hammer!LOL”.

D31F2203-8380-4255-B3F7-88E780D6EDA6

Final Show Setup Day 1

It was really exciting to finally make it at the show space! and see the alocated space for me to show my work and have a better visual about it! and of course meeting all of my collegues

in person!!

IMG_7015

The first thing I had to get started with was testing the videos on the projector! Jonathan had two options of projectors one of them would give brighter results + it would give a wider angle from a shorter distance the reason it made it our go to option!

The next challenge with the projector was to decide on the best way to get the videoes connected to it! unfortunatly the video couldn’t be played on the internal memory of the projector through a USB, we tried to change the video format many times, but still it wasn’t recognized. The second option was to use a media player which worked perfectly, the only down side to it was that the HDMI cable would get loose easily.

IMG_7017

Next was to decide how to project the video! which angle and size to use, and after couple of trials to project on the corner of the wall so the video would split on both sides was the perfect option! it gave it a more interesting outcome.

IMG_7023

Then I started to place the prints with temporary tape to see how I want it to look like. I placed the prints on the top of the video corners in two walls in random way.


IMG_7024IMG_7036

The third wall opposite of my two show walls had some tape still on it from the previous show, Iris did an amazing job helping me remove the tape and repaint the wall with white.

IMG_7040

IMG_7078

Critical Evaluation

When I joined MA Fine Art Digital programme two years ago, my first and most important motive was to develop my skills as an artist and get the right mentorship that would help me find my own signature style in more depth and research based way, specially that my background at university wasn’t art and my practice was built on self-taught basis, so this programme was the perfect way for me to develop my practice as an artist.

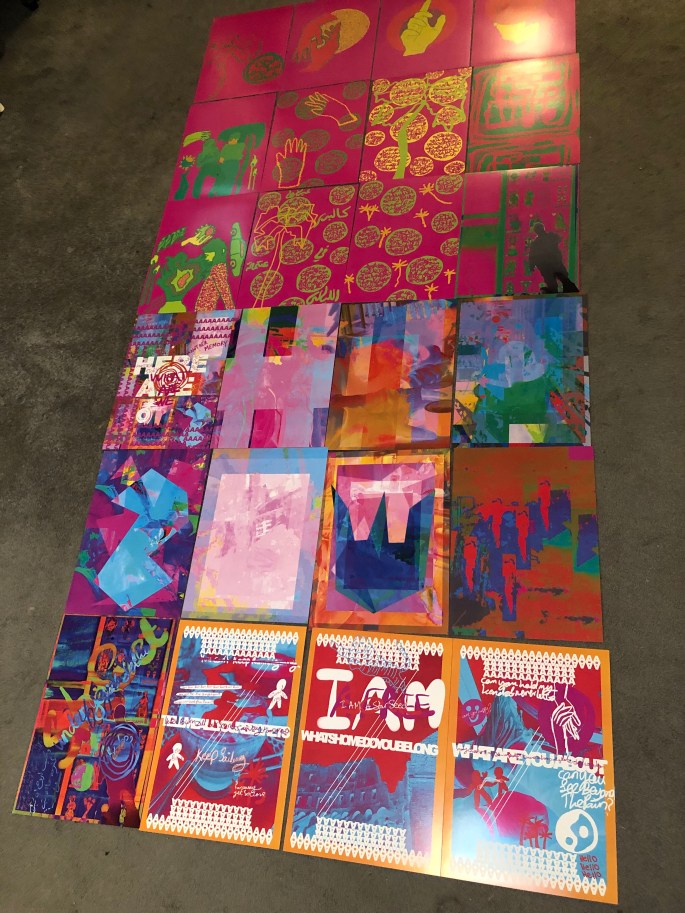
as a first year student in the course, I can say that it was the most experimental, learning phase for me. My work in the past was based on photography the most with little digital painting on top, which mainly were abstracted shapes and adding text to it but again still on a very minimal way. The discussions that we had during the online sessions and the research that I have done during the first year of my MAVA helped me a lot in exploring new ideas and new techniques that I applied to my practice. My research paper and my discussion about Kruger’s and Richter’s work about the relationship between the image, painting & text helped me a lot theoretically in deciding which practice I wanted to focus on specially that I was in a phase where I was doubting the use of text over images, but after completing my research paper I felt more passionate about continuing using text over images and taking it to a new level in my practice.

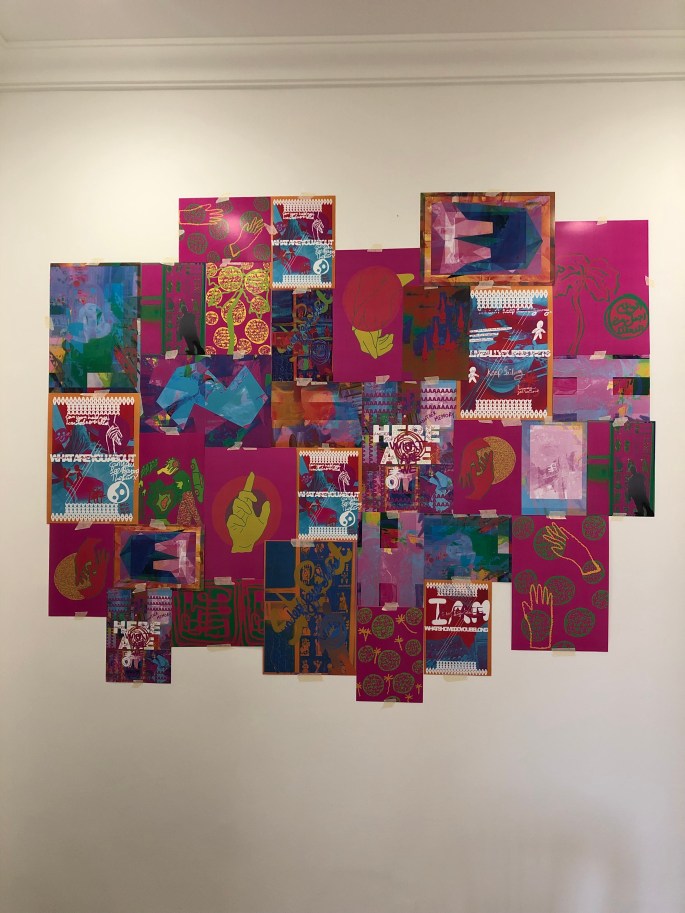
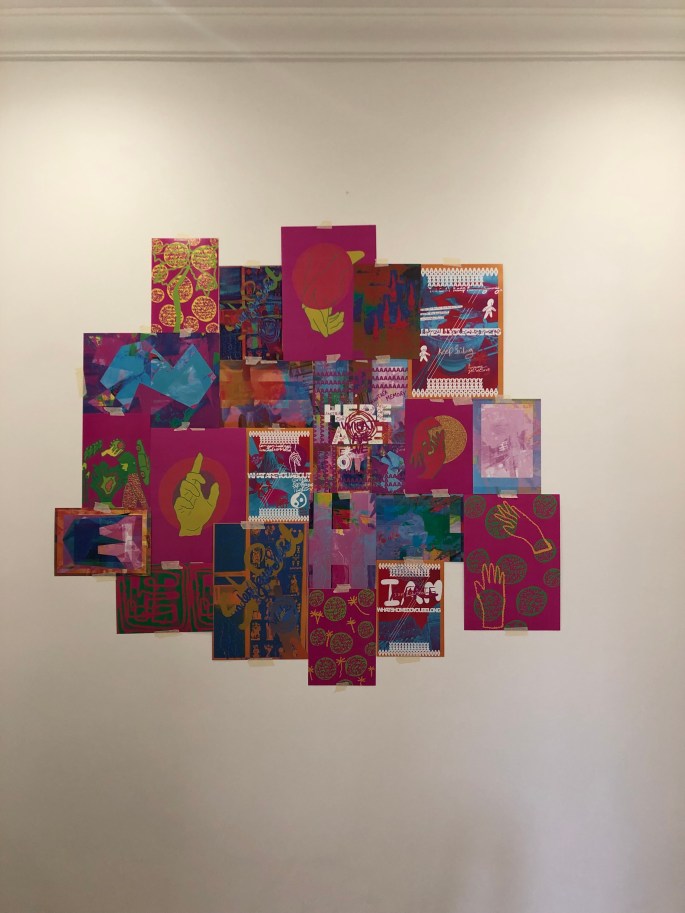
All of what I learned during year one helped to develop my practice further during my second year, and having a clearer idea and direction how to plan my final show accordingly. Creating videos that had the essence of my still art work was a new addition to my practice, I have always enjoyed playing with colors, words and images and having the option to create videos and adding it to my final show was a new addition that I am so excited about which I am interested to explore further more in the future.

I always have been passionate about art, design, fashion and life style, and these areas are what I want to explore and focus on my future plans. I want to present my work to the public as a whole experience where the viewer will be able to enjoy art in a very creative designed space, at the same time can purchase artistic fashion and life style items. The plan is to include that art space experience in my coffee shop where people would be able to grab a cup of a coffee and enjoy a full artist experience. I want also to create digital art workshops in that art space specially the most of community art classes are focused on classic art practices in Qatar and there is none so far focused on contemporary digital art. I want to apply as well to the artist in residence programmed offered by Qatar museums.

FINAL SHOW PRINTS

So I have been thinking for a while how I will print the art works, therefore I did some experments at home printing different options, because the plan was once I arrive at London I will print it all in the university Library.

IMG_5477 2

After doing the sample prints I felt that my prints should go full color for sure, I started exploring of the possibility of digital printing with low-cost in Qatar, which wasn’t easy to find be at the end I managed to find a place that will print it for me for good price. I did sample prints on Matt and gloss papers 300gm.

IMG_6572

I really liked the quality of it and decided to go with the Matt finish which actually there was no real difference between them.

My next challenge was choosing the final prints, and the thing I have many print designs but the colors I felt won’t go visually well with each other and with the videos at the end. So I decided to play with my previous works colors setup and try to harmonies the end result.

561BBC9F-B945-4E7C-8630-111F5CB98C9D

After changing the colors setup, I had to choose which work should go to print. So I choose 25 different art works, printed 2 copies each in A3 and 2 copies each in A4 to have a total of 100 prints.

IMG_6770

I was really happy with final prints quality where the colors were really vibrant and pretty and the thickness of the paper was perfect.

HERE WE ARE

playing with videos recently made me want to give a try to using the same edit techniques I used with the videos but this time with still images. So I played with number of my personal photos with my friend which holds a lot of memories and it felt like I was traveling back in time while looking at it. So I started playing around with each single image by its on. below are single images.

IMG_5418IMG_5417IMG_5420IMG_5419IMG_5421 2IMG_5422IMG_5423 2IMG_5424 2


After working for sometime on each image, I felt that there is still something missing! maybe by adding all of these images together I can create something new with more depth to it. so I added the images to one frame and then I did what I love the most! adding text ! I added large text in the middle at the same time I created random shapes using the letter A.


here we are


Then I still felt the work can take more into it! so I started drawing small motifs and write on top of it with my hand writing but digitally.

IMG_0633 2

Being honest here ! I felt so related to this work! because it has so much layers and meanings and even the direct or the hidden massages gave it more of an exciting element to it where you want to know more what’s going on here, yet it still represent the style I have been doing for a while but with a new twist to it.

new video//where are we going

So after my tutorial with JK I wanted to do another video which will be one of many more that I want to create. Here in this video I again used a clip that I took while I was in Africa Safari with my friends. you can hear the sound of nature where as well at the end my friend voice talking. on top of that I layered a picture of myself and my friend from my archive and then had different colored layers on top of it all and played with the mood of the picture. Finally I added text on top of it “where are we going”.

This video represents many of emotionally feelings I am going through now in my personal life where this question of where we are going is the main theme of it. and as unclear this video is this is how I feel about where I am heading towards personally.


Tutorial With JK


Today i had my tutorial with JK, which i believe went really well! got some really good feedback, inputs and suggestions for the final show, which made things clearer and kind of i know where i am moving towards now!

JK liked my video experiments which i really enjoyed doing and encouraged me to create more and consider to include it in my final show project.. i always wanted to create something with movement and step away from the printed work only.. i guess now i have a lot of experiments to do and alot of new videos to enjoy creating!

After discussing with JK how the final show project might look like “he helped by sharing the following sketches below” it was easier for me to write down my requirements in the wiki page which i will share here as well. I am glad that JK ideas were a continuation to what i had in mind which made me feel that finally i can say i am moving toward the right direction with my work.

As i mentioned to JK i dont look to my art work as a separate single frame work by itself rather i look at it as a form of integrated emotions that are reflected in many different forms.. and by the idea of having simple A3 and A4 digital prints of most of my work and mount them all together on one wall i feel that represents more of what i am trying to share with everyone. where every single piece of work represents a small fraction of the whole and the whole is just a reflection of the human pattern of thoughts, emotions, observations and judgment.

Final Show Requirements:

wall space to mount on different layers of A4 & A3 prints not less than 20/30 prints can do more even up to 100 or 200 (to be decided during the installation according to the space avilable) those prints will be printed at the printing services available at the library.Projector and maybe a stand for it to be projected on the wall on top of the printed art works. The projector will be used to project multiple colorful short videos were a dark room would be preferred yet with some dim light where the prints can be visible as well.


I will be sharing soon number of different artists previous works that I have been researching for a while, which I can say similar feels to what I am aiming to achieve but with a different take to it.